Time Away from Work for Employees
Disclaimer – Bronco Hub Job aids are currently transitioning to accessible WordPress pages. All current job aids are still available through Jobs Aids and Resources.
Who is this job aid for?
This job aid is for employees who need to:
- Submit a request for time away from work (absence) for yourself
Jump to Request Time Away Section - Update or withdraw a request for time away from work (absence)
Jump to Update or Withdraw Request Section - View personal scheduled absence calendar
Jump to Personal Scheduled Absence Calendar Section
Time Entry Deadlines
Hourly staff time entry is due on Mondays. Time cards will route to your line manager for approval.
Access Bronco Hub Time and Absences
Access Bronco Hub through your myBoiseState Employee View. In the Services section, locate the link for Bronco Hub.
After accessing Bronco Hub, proceed to the Me tab to access the Time and Absences app link.
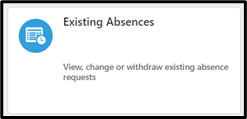
From Time and Absences, select either Add Absence to request an absence and submit for approval, Existing Absences to view, change, or withdraw existing absence requests, or Calendar to view your shifts, absences, and public holidays.
Steps to Submit a Time Off (Absence) Request for Yourself
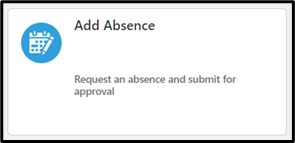
Step 1: Open Add Absence
Select the Add Absence graphic link to request an absence and submit for approval.
Step 2: Select Absence Type
Select the applicable absence Type from the dropdown menu OR type the Time Reporting Code (TRC) into the Type field. View Time and Absence Reporting Codes
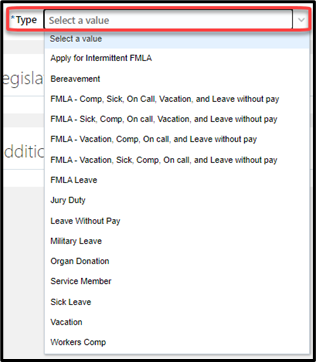
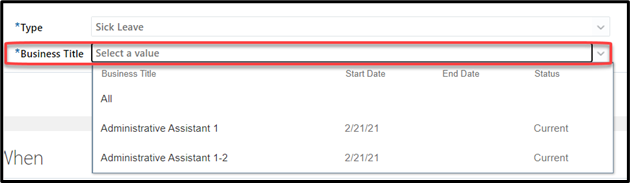
- Important Note: If you have multiple assignments, you will see the Business Title field below the Type field. The value will default to All. Select the drop-down arrow to select the applicable assignment you are requesting an absence for.
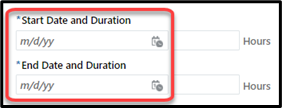
Step 3: Enter Absence Dates
Enter the Start Date and Duration and End Date and Duration for the absence. The Hours field defaults to your scheduled work hours per day.
If entering partial day absences, proceed to step 4, otherwise proceed to Step 5.
Step 4: Enter a Partial Day Absence
To enter a partial day absence, you must complete in the order below:
- Enter the number of hours in the Hours field. Select OK. Note: The absence duration does not change when entering hours. You must click Edit Entries to register partial hours.
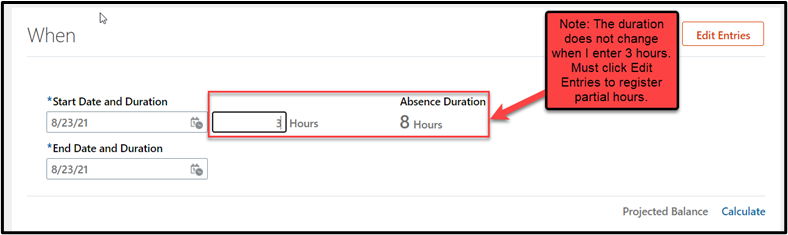
- Select Edit Entries then select Edit (pencil icon) to enter the hours again. Select OK. This action logs the partial day absence hours.

You must first enter the number of hours in the hours field and select Edit Entries after or your absence will default to your scheduled work hours per day.
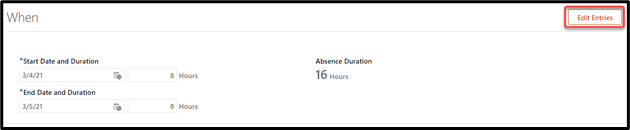
If you select multiple days, you can verify and edit the hours for each day by clicking the Edit Entries icon.
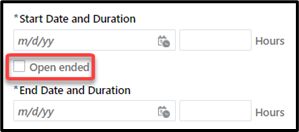
- Certain absence types have the option of an Open ended date. To schedule an opened ended absence, select the checkbox next to Open ended.
Please note that your leave balance is rounded. Your actual absence balance may be marginally lower than what is displayed if it is rounded up. If you encounter difficulties requesting or submitting vacation or sick leave for the entire amount shown in your balance, try reducing the absence duration by .1 and resubmitting.
Step 5 (optional): Enter Comments
Enter any relevant information in the Comments box.

Step 6: Submit for Approval
Select the Submit button to route for approval.

Other Errors
If you receive the following error, it is because you do not have enough leave time to submit the request: “Error: You can’t record this absence because your balance for plan Vacation Professional Leave will fall below the configured minimum for this type of absence.”

What’s next?
Once your request is submitted, you will receive a notification that your absence request was submitted and your line manager will receive a notification to review and approve or reject the request. Once your line manager approves or rejects your absence request, you will receive another notification.
Approved absences will transfer to Payroll for processing during the applicable pay period when the absence(s) will occur; employees do not need to enter the approved absence hours on their time card as the hours will automatically fill in.
Important Note: Professional/salary employees reporting absences through the absence module will not have a time card generated in Team Time Cards. In these instances, the approved absences are transferred to Payroll without a time card.
Steps to View, Update or Withdraw Your Time Away from Work (Absence) Request
Step 1: Open Existing Absences
Select the Existing Absences graphic link to view, changes, or withdraw existing absence requests.
Step 2: Edit or Withdraw Existing Absence Request
To update an existing absence, locate the applicable absence and select Edit (pencil icon). The section will expand and expose all detail fields.

- Important Note: You cannot update an Absence that has a status of Completed or Withdrawn.
Step 3: Enter Changes and Submit or Withdraw
Enter the applicable changes.
Pro Tip!
To make changes to individual days, select the Edit Entries button.
Select the applicable action, select Submit to route an updated absence request for line manager approval or select Delete to route an absence withdrawal request for line manager approval.

Other Errors
If you receive the following error, it is because you do not have enough leave time to submit the request: “Error: You can’t record this absence because your balance for plan Vacation Professional Leave will fall below the configured minimum for this type of absence.”
What’s Next?
Once your request is submitted, you will receive a notification that your absence request was submitted or withdrawn and your line manager will receive a notification to review and approve or reject the request. Once your line manager approves or rejects your absence request, you will receive another notification.
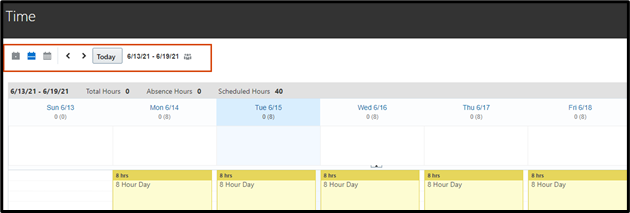
Steps to View Personal Scheduled Absence Calendar
Step 1: Open Calendar
Select the Calendar graphic link to view your shifts, absences, and public holidays.

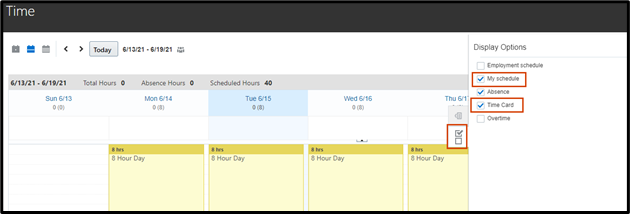
Step 2: View Scheduled Absences in Calendar
View scheduled Absences for the day, week, or month. You can modify the calendar view and dates via the options located above the calendar. Change the view to day, week or month and search for appropriate dates as needed.
The calendar view defaults to display your work schedule. To change the calendar view to display absences only, click the Display Options icon to the right-hand side of the screen and uncheck My Schedule and Time Card.
After viewing calendar information, exit Bronco Hub or click the Home button to return to the main screen.
Need help with your time card?
If you have additional questions about the process, contact the Human Resource Payroll team at payroll@boisestate.edu
If you need assistance with the process outlined above, submit a ticket using the OCI Service Request link.