Delegate Bronco Hub Approval Workflow Actions
Disclaimer – Bronco Hub Job aids are currently transitioning to accessible WordPress pages. All current job aids are still available through Jobs Aids and Resources.
Who is this job aid for?
This job aid is for employees who need to delegate approvals for the following transactions via Bronco Hub:
- Financial Tasks: Expense Reports, Invoice Payments, Requisitions and Budget
- Absence: Time Approval and Absence Approval
- HR Manager Self Service: New/ReHire, Data Change, Add Assignment, Promotion, Salary Change, and Individual Compensation (Additional Pay)
Video Tutorial - Delegating Approval Workflow
For a video tutorial of the delegating process, play the Delegating Approval Workflow video. Closed captions available in the video while a text description of the process is provided on this page.

Steps to Delegate Bronco Hub Approval Workflow Actions
Step 1: Access Bronco Hub Worklist Preferences
Access Bronco Hub through your myBoiseState Employee View. In the Services section, locate the link for Bronco Hub.
After accessing Bronco Hub, select the Notifications link (notification bell icon in the upper-right hand corner of the landing page) then select the Show All link.
- Note: The “Show All” view will vary depending on whether or not you have transactions pending action or if you have no notifications to display.

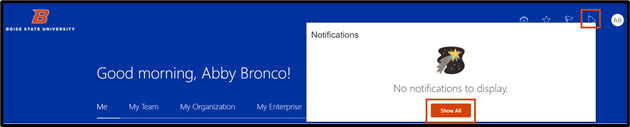
Select the Worklist button from the Notifications section.

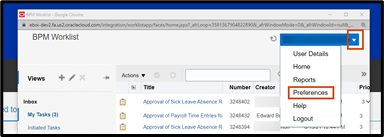
A BPM Worklist window will populate. Select the Expand button (chevron icon to the right of your name) and select Preferences from the drop down list.
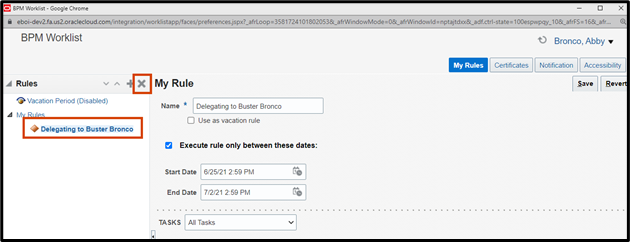
Step 2: Create Delegation Approval Rule
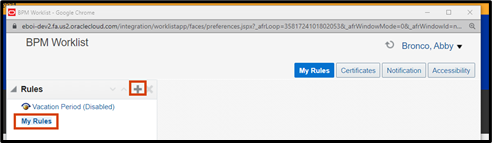
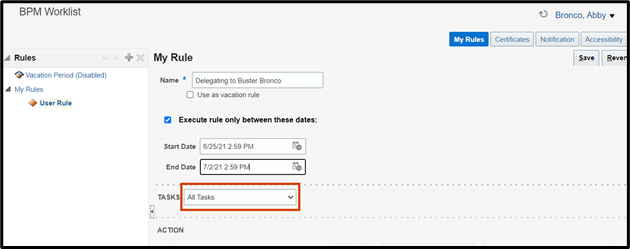
To delegate approval authority for all transactions, select the My Rules button on the left side of the screen and then select the the add button (+ icon).
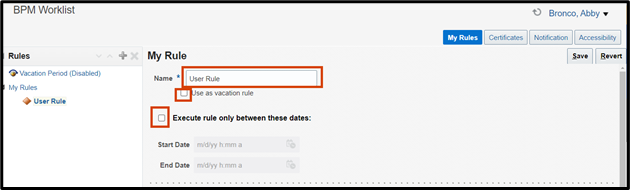
New fields will populate to create the rule parameters. Complete the following fields:
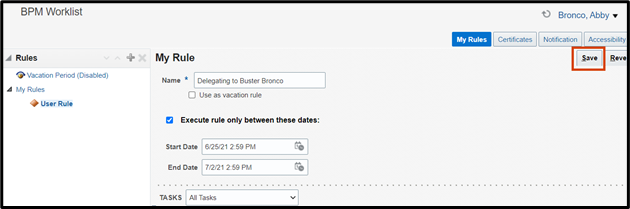
- Name: Enter a name for the delegation rule you’re creating. ProTip: Include the name of the person you are delegating approval authority to.
- Use as vacation rule: Select the checkbox if this delegation rule will be in place while you’re on vacation.
- Execute rule only between these dates: Select the checkbox to designate the rule for a specific time frame. Once the checkbox is selected, enter a Start Date and Enter Date.
Step 3: Delegate All Tasks
- Note: If you only want to delegate specific tasks, skip to step 4: Select Specific Delegation Tasks and Conditions
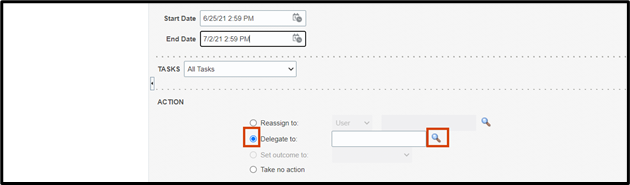
To delegate all tasks, select All Tasks from the TASKS dropdown.
To add the name of the person you are delegating to, select Delegate to and select the search button (magnifying glass icon) to search.
If searching by Users section, you must enter the username as it shows up in the individual’s email.
Example: email bettybronco@boisestate.edu type bettybronco (no spaces) in the Users search section.
Use any of the search parameters to locate the employee. Search parameter options include:
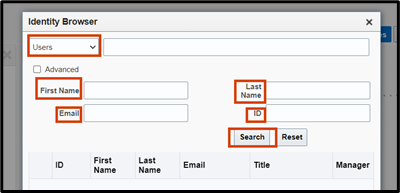
- Users (user name)
- First Name
- Last Name
- ID Number
After entering at least one search parameter, click Search.
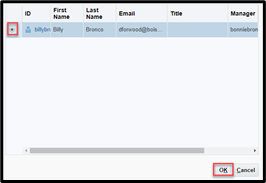
Select the radio button next to the appropriate name and then select OK.
Step 4: Select Specific Delegation Tasks and Conditions
- Note: If you delegated all tasks in step 3, skip this step and proceed to Step 5: Save Approval Rule Preferences.
Update task preferences in the TASKS section of the BPM Worklist window to customize the type(s) of tasks being delegated.
To select the task type, select the dropdown arrow and select Basic then Category.
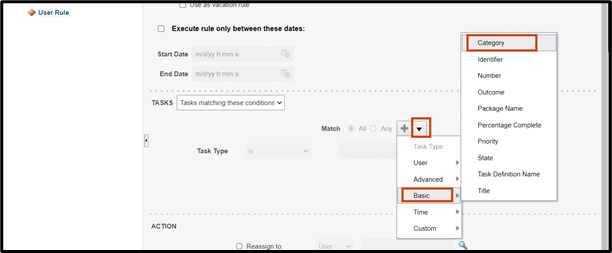
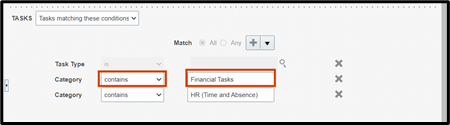
In the Category dropdown, select contains and type one of the following options into the additional field:
- Financial Tasks – type this option for Expense Reports, Invoice Payments, Requisitions and Budget
- Absence – type this option for Time Approval and Absence Approval
- HR (MSS) – MSS stands for Manager Self Service; type this option for New/ReHire, Data Change, Add Assignment, Promotion, Salary Change, and Individual Compensation (Additional Pay)
ProTip!
To add more than one delegation rule, repeat this step from the beginning.
To add the name of the person you are delegating to, select Delegate to and select the search button (magnifying glass icon) to search.
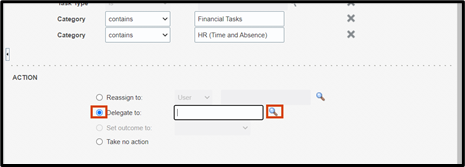
If searching by Users section, you must enter the username as it shows up in the individual’s email.
Example: email bettybronco@boisestate.edu type bettybronco (no spaces) in the Users search section.
Use any of the search parameters to locate the employee. Search parameter options include:
- Users (user name)
- First Name
- Last Name
- ID Number
After entering at least one search parameter, select Search.

Select the radio button next to the appropriate name and select OK.
Step 5: Save Approval Rule Preferences
Select Save to save the delegation rule.
What’s next?
The rule will be in place according to the parameters specified in the saved rule.
To remove a previously saved Approval Rule, select User Rule from the left navigation Rules panel and select the X.
Need help with delegating?
If you need assistance with the process outlined above, submit a ticket using the OCI Service Request link.