View Initiated Bronco Hub Tasks via Worklist or View and Take Action on Manager Self Service Actions
Disclaimer – Bronco Hub Job aids are currently transitioning to accessible WordPress pages. All current job aids are still available through Jobs Aids and Resources.
Who is this job aid for?
This job aid is for employees who need to:
- View Initiated Bronco Hub Tasks via Worklist
Jump to View Initiated Bronco Hub Tasks via Worklist
Section - View and Take Action on Manager Self Service Actions
Jump to View and Take Action on Manager Self Service Actions Section
Steps to View Initiated Bronco Hub Tasks via Worklist
Step 1: Access Bronco Hub
Access Bronco Hub through your myBoiseState Employee View. In the Services section, locate the link for Bronco Hub.
Step 2: Access Notifications
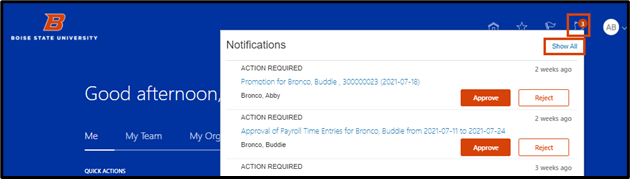
Navigate to the Notifications link (bell icon in the upper right hand corner) and select the Show All link in the Notifications section.
Step 3: Access the Worklist
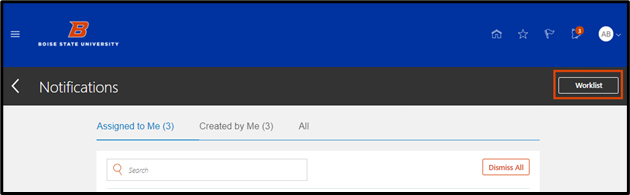
Select the Worklist button.
Step 4: Select Initiated Tasks
In the new window, select the Initiated Tasks link located after the Inbox link.
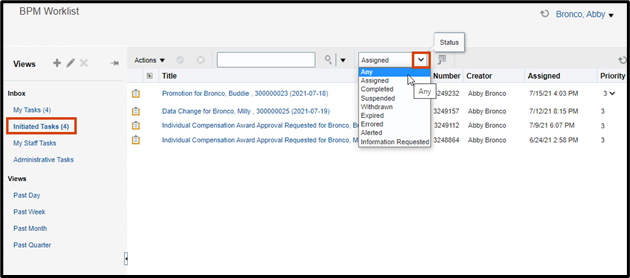
Update the Status form field from “Assigned” to Any by selecting it from the drop down list.
Not all initiated actions display in the default view. If searching for an action (e.g. ICP/Additional Pay) and the action does not display in the default view, use the search function to search by action terms.
Search by terms like Hire, Compensation, Data Change or search by last name of employee that was transacted upon (e.g. data change submitted for Buddy Bronco, enter “Bronco” in the search field).
After entering a search parameter, select the Search button (magnifying glass icon).
When searching for tasks you initiated, always update the search status to Any.
To expand the timeframe of initiated tasks, select a view option from the left hand navigation panel. Options for views include Past Day, Past Week, Past Month and Past Quarter.
Step 5: View List of Initiated Tasks
A list of initiated tasks display. For more details about a task, select the title hyperlink.

ProTip!
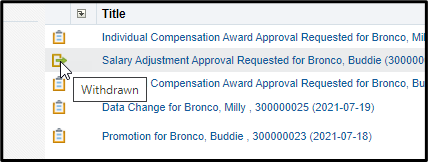
Hover over the icon to the left of the title for a quick glance of task status. The example below includes the icon for a task that has been withdrawn.
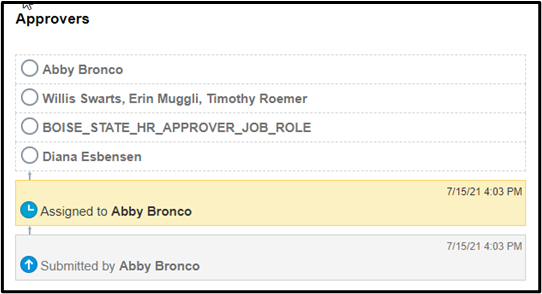
To see where an action is the approval workflow, select the action hyperlink. A new window will appear and any approval workflow details will display at the bottom of the window.
Steps to View and Take Action on Manager Self Service Actions
When an employee submits a request, or you are next in the approval workflow, you will need to take action on requests through Bronco Hub – HCM or through the system generated email notification sent to your employee inbox.
Step 1: Log in to Bronco Hub
Access Bronco Hub through your myBoiseState Employee View. In the Services section, locate the link for Bronco Hub.
Step 2: Locate Requests to Review Transactions
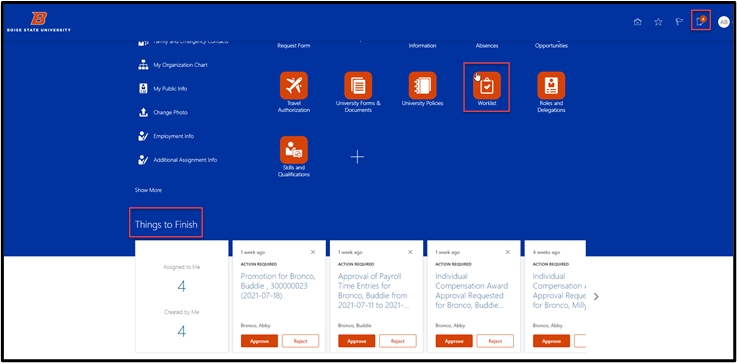
Once a requester submits a transaction, the request will appear in three locations within Bronco Hub:
- Notifications graphic link
- Things to Finish section
- Worklist graphic link
Step 3: Review the Transaction
Before taking action, please review the transaction information.
To see the transaction details, navigate to one of the three notification locations listed in step 2 and select the transaction name, which is hyperlinked.
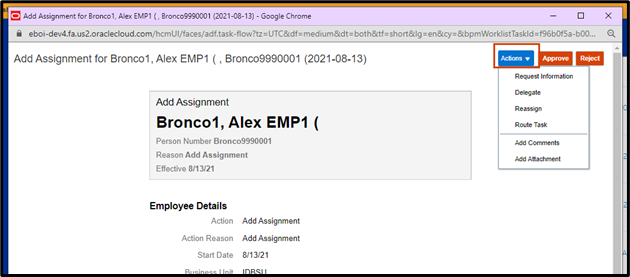
A new window will open with all of the transaction details. After reviewing the details, you can either Approve, Reject, or select an Action for the transaction.
Step 4: Approve, Reject, or Additional Actions
Approve
If the transaction is accurate, select the Approve button at the top of the pop-up window or next to the notification using the Notification link at the top or the Things to Finish section.
- Please Note: This will route the transaction to the next approver or will complete the approval process if you are the final approver. You can see workflow approval at the bottom of the pop-up window unless you are the final approver.
The employee will receive an email that their request has been approved and can see the approval in their notifications.
Reject
Selecting Reject stops the transaction from moving forward and will notify the requestor that their request has been denied. They will receive an email and a notification in their Bronco Hub account that their request has been rejected.
Additional Actions
Additional Actions to choose from include the following:
- Request Information
- Delegate
- Reassign
- Route Task
Request Information
The option pauses the transaction so the manager can ask clarifying information from the requestor before taking action. The requestor will receive an email that they can respond to with additional information. Once the additional information is submitted, the individual that requested the information will receive a follow-up notification prompting them to review the information and take action on the transaction.
To take the request information action, click on the request (hyperlinked) in one of three notification locations. Next to the Approve and Reject buttons, there is an Actions drop-down menu.

- Note: comments are required when taking the request information action.
For actions that have an approval workflow beyond time and absence, you can choose to route the request back to you, or continue on in the approval process once the employee makes changes or answers questions regarding the transaction.
Delegate
Send the approval notification to another individual to take action on your behalf. That individual will be able to view the same notification information that the original assignee would because it will display based on the security roles and privileges of the original assignee.
Reassign
Send the approval notification to another individual to take action as that individual. That individual will only be able to view information that is available based on their security roles and privileges.
Route Task (AdHoc)
Allows the current approver to add an additional approver to the workflow while also taking action (approve, request information) on the transaction.
Need help with these steps?
If you need assistance with the process outlined above, submit a ticket using the OCI Service Request link.