The Cover block is used to add an image or solid background color that comprises the full width of the default margins of page or post.
You can add text “on top” of the background. In effect, adding text creates a unique header or banner display. An advantage of using text overlaying the image is that the text is standard HTML text, not an image of text. This significantly helps assistive devices and search engines to understand your text.
By customizing the settings of the Cover block, you can achieve a parallax scrolling effect where the image scrolls within the block at a faster rate than scrolling the page itself, which may give the impression of depth or distance.
Cover block example with parallax scrolling
Boise State University
How to add the Cover block
- Type / to choose a block: On a new line, type a backslash and the work “cover”. A pop-up will display available block; click on the Cover block to add it to your content.
- Click on the Block Inserter: In the top toolbar, click on the square blue icon with the plus sign. This will open a panel to display all blocks. Select the Cover block to add it to your content.
Important
The Cover block features many settings for text alignment and image appearance. Just because you can tweak these settings does not necessarily mean that you should.
Read on to understand what you can and can’t do with the Cover block in our environment.
How to use the Cover block
Images
Image size and height
The Cover Block uses images optimized for the web at 1192 wide by 687px in height. If you use an image that is wider or taller, your Cover block image may appear pixilated or cropped in a way that you don’t expect.
Choose your image carefully
Due to how the Cover block crops images, we recommend that you use photos of landscapes, buildings, or static objects instead of people.
If you use a photo of one or more people, it’s possible that only their torsos will initially display. Unless it’s Halloween, that might be confusing for your visitors.
Upon adding the Cover block, you’ll see options to “Upload” an image, choose an image from the “Media Library,” or “Use featured image.”
Because “featured” images are generally 664 x 664, don’t select that option. Either upload your Cover block image, or select it from your Media Library if it already resides there.
Image options
Once you select your image, you can use the block options to:
- Adjust the image width
- Activate parallax scrolling
- Add a filter to the image
- Add a solid color behind the overlay text
- Change the color of the text
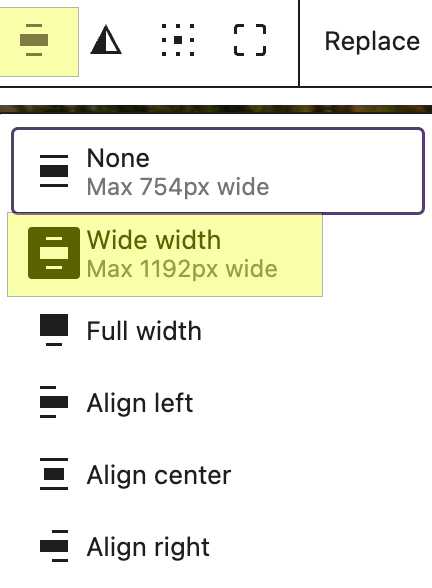
Adjust the image width
When you initially upload an image to the Cover block, your image will match the margins of your paragraph text.
If you want the image to appear as wider than your paragraph margins, click once on your block to activate the block toolbar, then select the Align button. Choose the Wide width option:
Activate parallax scrolling
Select your block and activate the toggle for Fixed background in the Block settings menu in your editor:

Add a filter color overlay
You can enhance your image by adding a color overlay. Select your block and click the Styles options (the half-filled circle icon) in the Block settings menu in your editor.
Choose from the solid colors offered, or configure your own color:

You can also apply a Duotone filter and configure the opacity of your overlay color. Don’t go wild by creating purple or lime photos…keep our brand standards in mind. You may want to consider using a (tasteful) color to darken or lighten a photo in order to make the text stand out more against the background.
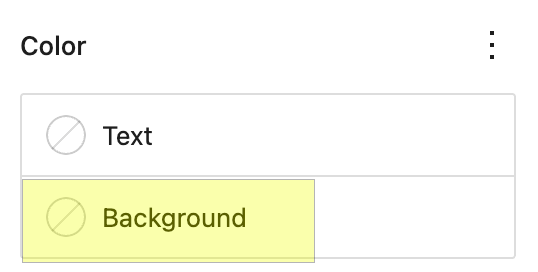
Add a solid color behind the overlay text
You can add a solid color behind your text that can help add additional contrast between your overlay text and image:
Boise State University
To do this, select your text and click Background in the Block settings menu in your editor:
Choose from one of the available colors, or create your own color by clicking on the gray and white checkerboard area. In the following example, I’ve created a custom color by adding the digital hex value of Boise State’s digital blue:
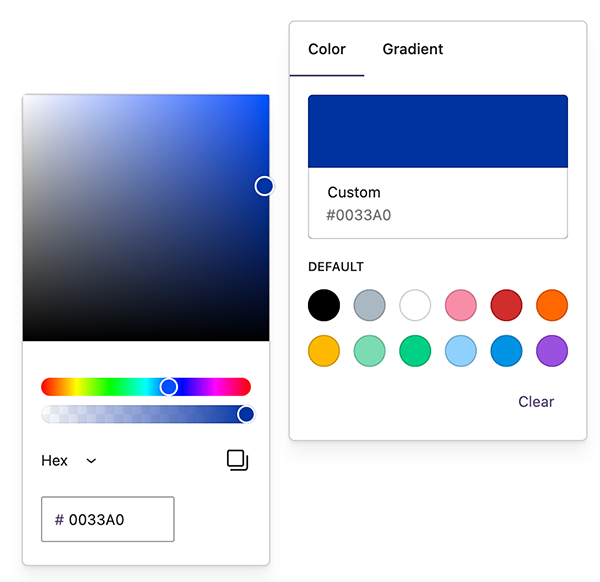
You can also change the text color through Text settings the same way.
Solid color options
You can also choose a solid color for your Cover block instead of a photo.
Several default colors appear when you initially add the Cover block:

Selecting one of these colors will create a solid color for your Color block.
However, because university branding is an important component of our custom theme, we want to be sure that any solid color used with the Cover block reflects Boise State’s official colors for digital use.
Edit the Cover block background color
- Select your block and click the Styles options (the half-filled circle icon) in the Block settings menu in your editor.
- Select Overlay
- Click on the gray and white checkerboard pattern
- Enter the hex value for the color you want to use:
- 0033A0 for Boise State blue
- D64309 for Boise State orange
- FFFFFF for white
Example of a Cover block with a solid background color that uses Boise State’s digital blue and white text:
Boise State University
Use the Cover block wisely
Please do not use more than one instance of the Cover block on a page. Multiple Cover blocks on a single page may cause significant performance issues on some devices.
The Cover block is designed to be an interstitial element and should not be used as a page title or a heading.
We know there are many options available for the Cover block. If you have questions about how to use this block, particularly with regard to compliance with the university’s brand and web standards, please reach out to the WordPress Support Team through the Help Desk.